

This is one of the biggest FAQ’s we get on the mailing list: I followed the iOS
signing tutorial
or
video tutorial
and still didn’t succeed in signing (notice that you need to actually read the links above, the certificate you get from the apple website is not enough!).
signing tutorial
or
video tutorial
and still didn’t succeed in signing (notice that you need to actually read the links above, the certificate you get from the apple website is not enough!).
How do I debug something like this?
Notice that some of these signing failures will sometimes manifest themselves during build and sometimes will manifest during the install of the application.
Well, there are several steps we always need to follow when troubleshooting such issues:
-
You
must
use a Mac to generate the P12 certificates. There is no way around it! (tutorials that show otherwise will not work).
We would like to automate it in the future (in a similar way to our Android signing tool), but for now you can use
MacInCloud
which has a free version.
Notice that this is something you need to do once a year (generate P12), you will also need a Mac to upload your final app to the store though. -
When exporting the P12 certificate make sure that you selected BOTH the public and the private keys as illustrated in the image to the right. -
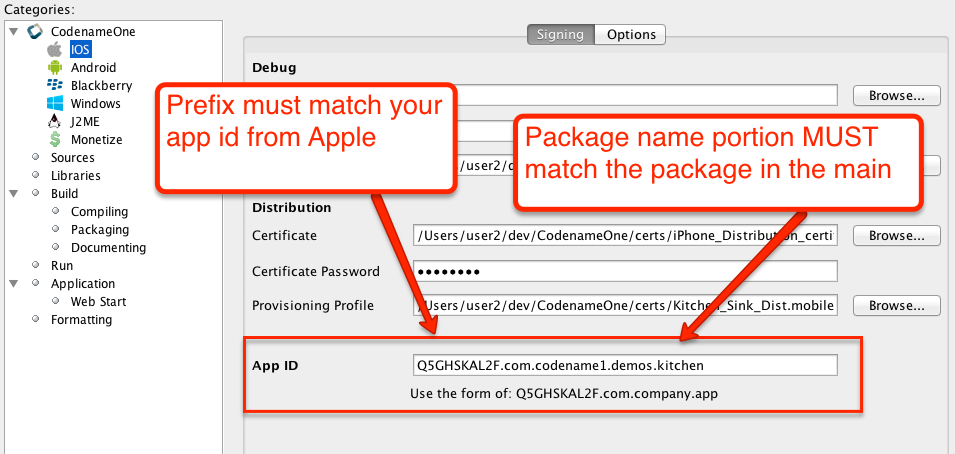
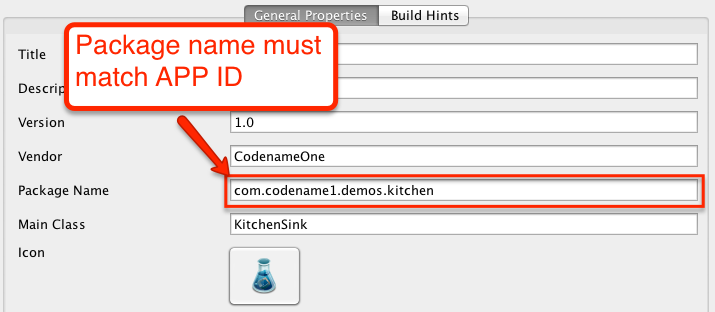
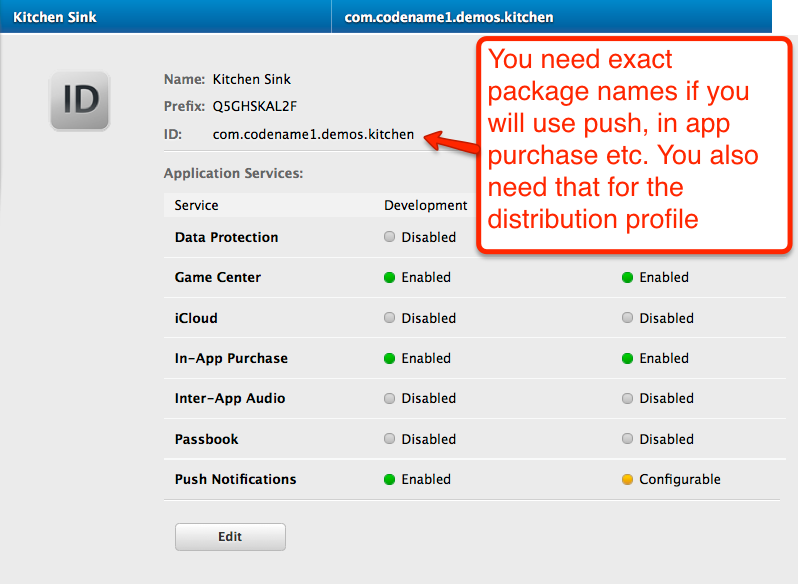
Make sure the package matches between the main preferences screen in the IDE and the iOS settings screen (see pictures below). -
Make sure the prefix for the app id in the iOS section of the preferences matches the one you have from Apple
(see pictures below)
. -
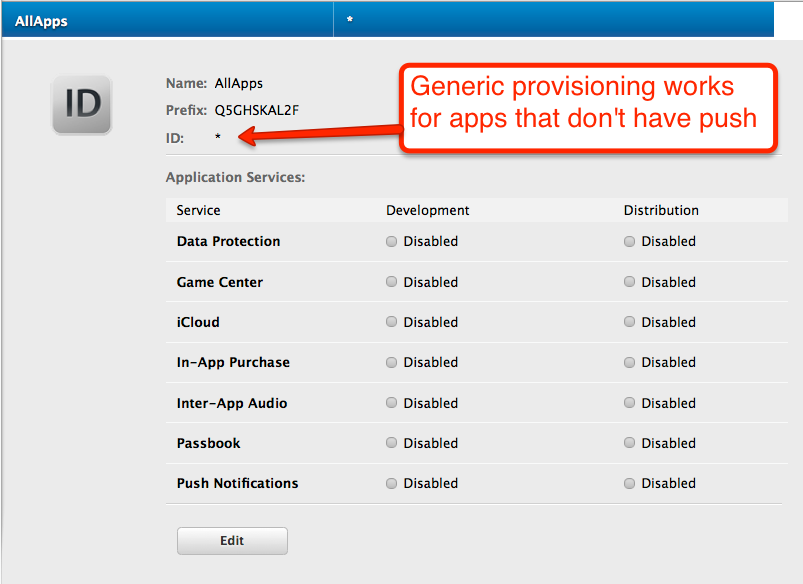
Make sure your provisioning profile’s app id matches your package name or is a * provisioning profile. Both are sampled in the pictures below, notice that you would need an actual package name for push/in-app-purchase support as well as for app store distribution. -
Make sure the certificate and provisioning profile are from the same source (if you work with multiple accounts), notice that provisioning profiles and certificates expire so you will need to regenerate provisioning when your certificate expires or is revoked. -
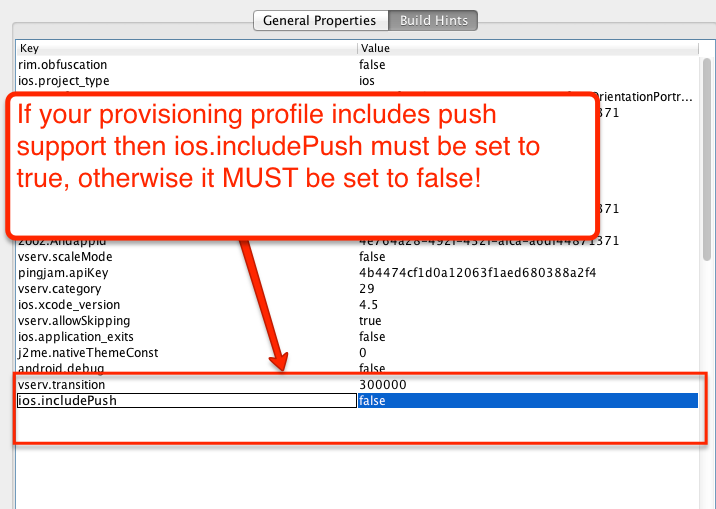
If you declare push in the provisioning profile then ios.includePush (in the build arguments) MUST be set to true, otherwise it MUST be set to false
(see pictures below)
.
Did this help you? Let us know in the comments.

Notice: This post was automatically converted using a script from an older blogging system. Some elements might not have come out as intended…. If that is the case please let us know via the comments section below.

13 Comments
MacCloud has a free option, I did not see that.
This blog was a life-saver. I just went through this, and had a myriad of problems, compounded by my own stupidity, and my ignorance of ios App development and Mac in general.
The saving of the two keys tripped me up. Seemed subtle in the video, and easily missed.
Regarding the AppId, Might I suggest, since you are taking both properties,
codename1.packageName, and codename1.ios.appid,
you have Ant or some other preprocessor check to see that the ending of the appid conforms to the packageName before the build is sent to the server. I had this wrong yesterday and was able to initiate a server side build (followed) certificate errors.
Thanks!
There are indeed a lot of things we need to do and can do on the client side before actually sending the build to the server. I think there is even an issue for the various types of static analysis we can perform locally, unfortunately we never got around to doing that.
Thank you, this is an extremely useful post. One thing to add (in case someone stumbles upon the same problem):
When exporting private key / certificate pair from Mac’s keychain you will be prompted for a password to protect your private key. You _MUST_ enter a password that is at least 4 characters long – there will be no warnings / errors if you don’t, but build signing will quietly fail.
(3) Make sure the package matches between the main preferences screen in the IDE and the iOS settings screen (see pictures below).
Im my mac, dont existe option to “export 2 files”
I return to this problem once a year. How do I extract proper mobile provision files from development environment? I spend around hour each time, macos is very alien environment.
There is a tutorial covering this in the How Do I section.
An important omission is that sometimes install fails on the device the first time around thru the link/QR code but succeeds via itunes. This is due to provisioning profile configuration on the device and seems to be an Apple bug.
After installing once with itunes future installations should work thru the QR code.
I just wanted to share with you that (despite what it says in Point 1.) I have successfully created a development P12 certificate on my Windows machine using XCA. I followed the steps described here:
[http://smarttechie.org/2013…](http://smarttechie.org/2013/12/13/how-to-create-apple-safari-extension-developer-certificate-for-windows/)
Did you get a build passed?
With the old VM? New VM?
I don’t know which VM. I just sent the build to the build servers along with the p12 certificate and it installed all right on my iPhone.
The default is the new VM with xcode 6. If you set ios.newVM=false I’m guessing your build will fail. Can you verify this?
If so it might mean the new VM has another nice advantage over the old VM.
It also works with set ios.newVM=false but the new VM seems to work better.
Tom