This past Thursday morning, I hosted our third tech-talk/webinar for the community. The first two included tutorials that were targeted at absolute beginners. This time I wanted drill down and cover a more advanced topic: creating themes.
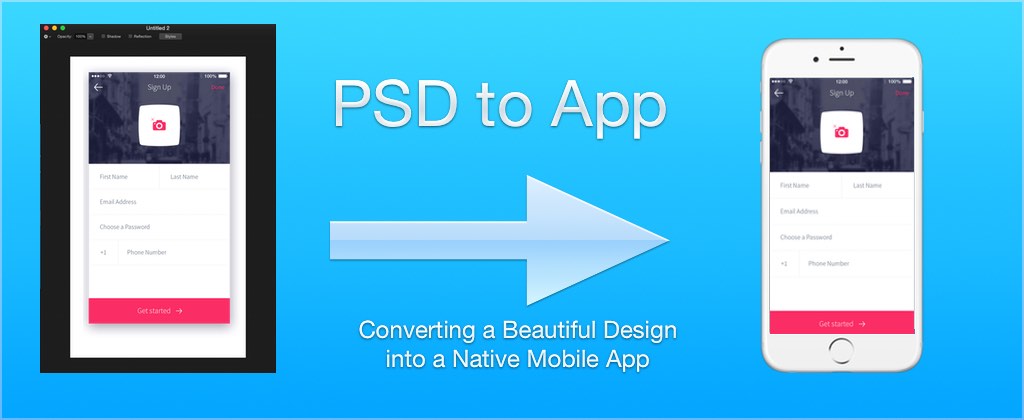
Codename One provides extensive support for designing beautiful user interfaces, but it isn’t necessarily obvious to new developers how to achieve their desired results. A common workflow for app design includes a PSD file with mock-ups of the UI, created by a professional designer.
For this tutorial, I adapted a very slick looking sign-up form that I found online, and converted it to a Codename One component that can be used inside an application. The process I followed was:
-
Find the PSD design I want to use
I found this nice sign-up form in this PSD file created by Adrian Chiran :

-
Re-create the general structure and layout of the design in a Codename One component using nested components and layout managers. Here is a break-down of how I structured the component hierarchy in my Codename One Component:

-
Extract the images we needed using Photoshop.
-
Extracted the fonts, colors, and styles we needed to reproduce the design in Codename One.
-
Imported images into our Codename one project, and defined theme styles so that are component matches the look of the original design.
Here is a screenshot of the resulting component running inside the Codename One simulator:

I also built this demo project using the Codename One Javascript port and have posted it online with simulated densities for the iPhone 3G, iPhone 4, and iPhone 5, so you can try out the form, and see how it adjusts to different screen densities and resolutions.
| Currently only Chrome, Firefox, and Safari are supported. |
Here is a video of the tutorial:
By applying just a few simple techniques, you can spice up your App’s UI and set it apart from all the rest.
Sneak Peak at CSS Support
Near the end of the tutorial, I gave a sneak peak at the upcoming CSS theming support, and showed how we can produce the same design using CSS instead of using the resource editor. Personally I prefer to use a text-based format like CSS for defining my themes. It is easier to re-use styles between projects and share themes with other developers. Once you are well-versed in CSS, it is generally also much faster than working with a GUI tool.
Just to give you a taste of what is involved in theming a component with CSS, here is the Java source for my SignUpForm component. Pay special note to the setUIID() calls which register components with specific IDs that I target from CSS:
package com.codename1.demos.css;

import com.codename1.ui.Button;
import com.codename1.ui.Command;
import com.codename1.ui.Component;
import com.codename1.ui.Container;
import com.codename1.ui.Display;
import com.codename1.ui.Form;
import com.codename1.ui.Label;
import com.codename1.ui.TextField;
import com.codename1.ui.events.ActionEvent;
import com.codename1.ui.layouts.BorderLayout;
import com.codename1.ui.layouts.BoxLayout;
import com.codename1.ui.layouts.FlowLayout;
import com.codename1.ui.layouts.GridLayout;
import com.codename1.ui.util.Resources;

/**
 *
 * @author shannah
 */
public class SignUpForm extends Form {
    final Resources res;
    public SignUpForm(Resources res) {
        super("Sign Up");
        this.setUIID("SignUpForm");
        this.res = res;
        setLayout(new BorderLayout());
        Container north = new Container(new FlowLayout(Component.CENTER));
        north.setUIID("SignUpNorth");

        Button photoButton = new Button(res.getImage("profile-photo-button.png"));
        photoButton.setUIID("PhotoButton");
        north.addComponent(photoButton);

        this.addComponent(BorderLayout.NORTH, north);

        Container center = new Container(new BoxLayout(BoxLayout.Y_AXIS));
        center.setUIID("SignUpCenter");

        Container row1 = new Container(new GridLayout(1,2));
        TextField firstName = new TextField();
        firstName.setUIID("SignUpField");
        firstName.setHint("First Name");
        firstName.getHintLabel().setUIID("SignupFieldHint");
        TextField lastName = new TextField();
        lastName.setUIID("SignUpField");
        lastName.setHint("Last Name");
        lastName.getHintLabel().setUIID("SignupFieldHint");
        row1.addComponent(firstName);
        row1.addComponent(lastName);
        center.addComponent(row1);
        center.setScrollableY(true);

        TextField email = new TextField();
        email.setUIID("SignUpField");
        center.addComponent(email);
        email.setHint("Email Address");
        email.getHintLabel().setUIID("SignupFieldHint");

        TextField password = new TextField();
        password.setUIID("SignUpField");
        password.setConstraint(TextField.PASSWORD);
        password.setHint("Choose Password");
        password.getHintLabel().setUIID("SignupFieldHint");
        center.addComponent(password);

        Container row4 = new Container(new BorderLayout());
        Label code = new Label("+1");
        code.setUIID("SignUpLabel");
        row4.addComponent(BorderLayout.WEST, code);

        TextField phoneNumber = new TextField();
        phoneNumber.setUIID("SignUpField");
        phoneNumber.setHint("Phone Number");
        phoneNumber.getHintLabel().setUIID("SignupFieldHint");
        row4.addComponent(BorderLayout.CENTER, phoneNumber);

        center.addComponent(row4);

        this.addComponent(BorderLayout.CENTER, center);

        Button getStarted = new Button("Get Started", res.getImage("right_arrow.png"));
        getStarted.setGap(getStarted.getStyle().getFont().getHeight());
        getStarted.setUIID("SignUpButton");
        getStarted.setTextPosition(Component.LEFT);

        this.addComponent(BorderLayout.SOUTH, getStarted);
        this.addCommand(new Command("Done") {

            @Override
            public void actionPerformed(ActionEvent evt) {

            }

        });

        this.setBackCommand(new Command("", res.getImage("back-arrow.png")) {

            @Override
            public void actionPerformed(ActionEvent evt) {

            }

        });


    }
}
And here is the CSS I used to style the app to look like the PSD design:
/**
 * Import the TTF font to use for all the buttons
 */
@font-face {
    font-family: "Source Sans Pro";
    src: url(https://raw.githubusercontent.com/google/fonts/master/ofl/sourcesanspro/SourceSansPro-Light.ttf);
}


@media cn1 {

    /**
     * Import the images that we want to use in our form.
     */
    ProfilePhoto {
        background-image: url(../assets/profile-photo-button.png);
        cn1-image-id: "profile-photo-button.png";
    }

    RightArrow {
        background-image: url(../assets/right_arrow.png);
        cn1-image-id: "right_arrow.png";
    }

    BackArrow {
        background-image: url(../assets/back-arrow.png);
        cn1-image-id: "back-arrow.png";
    }


    /**
     * Set background for the form itself.
     */
    SignUpForm {
        cn1-derive: Form;
        background-image: url(../assets/signup-form-bg.png);
    }

    /**
     * Make the title bar transparent.
     */
    TitleArea {
        background-color: transparent;
    }

    /**
     * Use the TTF font in all components that need it.
     */
    Title, SignUpField, SignUpLabel, SignUpButton, TitleCommand, BackCommand, SignupFieldHint {
        font-family: "Source Sans Pro";
    }

    /**
     * Make the top-right "Done" button text pink.
     */
    TitleCommand {
        color: rgb(247, 50, 103);
    }

    /**
     * When the "Done" button is pressed, make the text white.
     */
    TitleCommand.pressed {
        color: white;
    }

    /**
     * Add styles for the text fields.
     */
    SignUpField, SignUpLabel {
        border: 1px solid rgb(245, 245, 245);
        padding: 2mm;
        background-color: transparent;
        color: rgb(77, 96, 111);
        margin: 0;
    }

    /**
     * Text fields use iternal Label for hints.  Set styles on those separately.
     */
    SignupFieldHint {
        color: rgb(77, 96, 111);
        font-size: small;
    }

    /**
     * White background for center panel (behind text fields).
     */
    SignUpCenter {
        background-color: white;
        margin: 0;
    }

    /**
     * Bottom pink "Getting Started button"
     */
    SignUpButton {
        background-color: rgb(247, 50, 103);
        margin: 0;
        padding: 2mm;
        text-align: center;
        color: white;
    }

    /**
     * Make getting started button gray background when pressed.
     */
    SignUpButton.pressed {
        background-color: gray;
    }
}
Here is a video tutorial showing how to create the theme for the sign-up form using CSS:
I don’t have an exact date when CSS support will be released to the wild, but it will be soon. Some of the features include:
-
Support for all current Codename One styles: colors, alignment, background images, borders (both regular and 9-piece), padding, margin, etc..
-
Gradients, shadows, rounded corners, and other nice CSS effects – that are performant.
-
Auto 9-piece border generation for backgrounds and borders that require it (e.g. for rounded corners, shadows, and gradients).
-
Auto multi-image generation.
-
Loading images and fonts from both local paths and remote URLs.
I’ll be posting more on this soon. Stay tuned.
A Social Experience
While the tech talk was centered around the tutorial, it also provided a forum for the community to interact and socialize. Throughout the presentation, the chat area was active with questions and discussions. With Chen participating in the discussion, and answering questions, this did not interfere at all with the tutorial, and it seemed to add a nice social dimension to the webinar. I hope this continues in future webinars, and I hope you’ll join us and become part of the conversation.
Do You Want to Share?
As these webinars will be happening every two weeks, I’d like to make some time for members of the community to talk about things that they’ve been working on. Have you developed something in Codename One that you want to share with the community? Drop me an email ([email protected]) and let me know your idea, and I’ll try to prepare a slot in an upcoming webinar for you to talk about it.

3 Comments
Great tutorial. Is there any reason you copied/pasted the unselected UUID’s to selected, and didn’t right click -> Derive them ?
Just amazing. A real inspirational and interesting video.
Love this article. Nicely explain all the points with code example and self explaining images. Amazing . More then enough for the beginner. He/she can learn alot of thing by such amazing tutorials.