
In the second part of this tutorial we will cover the login process for Google and getting a unique id. We’ll try to
write generic code that we can later reuse for the Facebook login process. But first lets cover what “signing in”
actually means…
When you handle your own user list and a user signs in thru registration, you can generally ask that user anything.
However, when the user signs in thru Facebook, Google or any other service then you are at the mercy of that
service for user details… This is painfully clear with such services that don’t provide even an email address by
default when logging in. It is sometimes accessible in Facebook but only for users who didn’t choose to hide it.
Worse, one of the main reasons for using such a service is to access the contacts… However, Facebook no longer
allows developers access to your Facebook friends. A Facebook app developer can only access the list of friends
who have the app installed and to accomplish that we will need to “invite” people to use/install the app.
Getting Started – Configuration
Pretty much everything discussed in this blog post is covered here.
However, that is a rather general post so in this tutorial I’ll try to be more specific.
Start by going to the the Google developer console: https://console.developers.google.com/
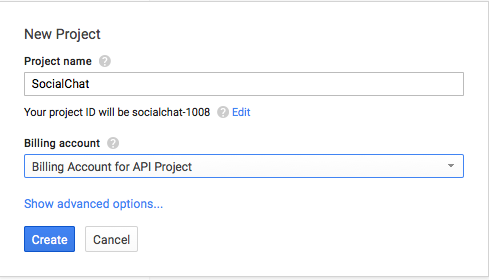
Create a new app by pressing the create button:

Just enter the name of the app e.g. for this case its SocialChat and press “Create”:
Now can select the API’s section where you should see the new project page:
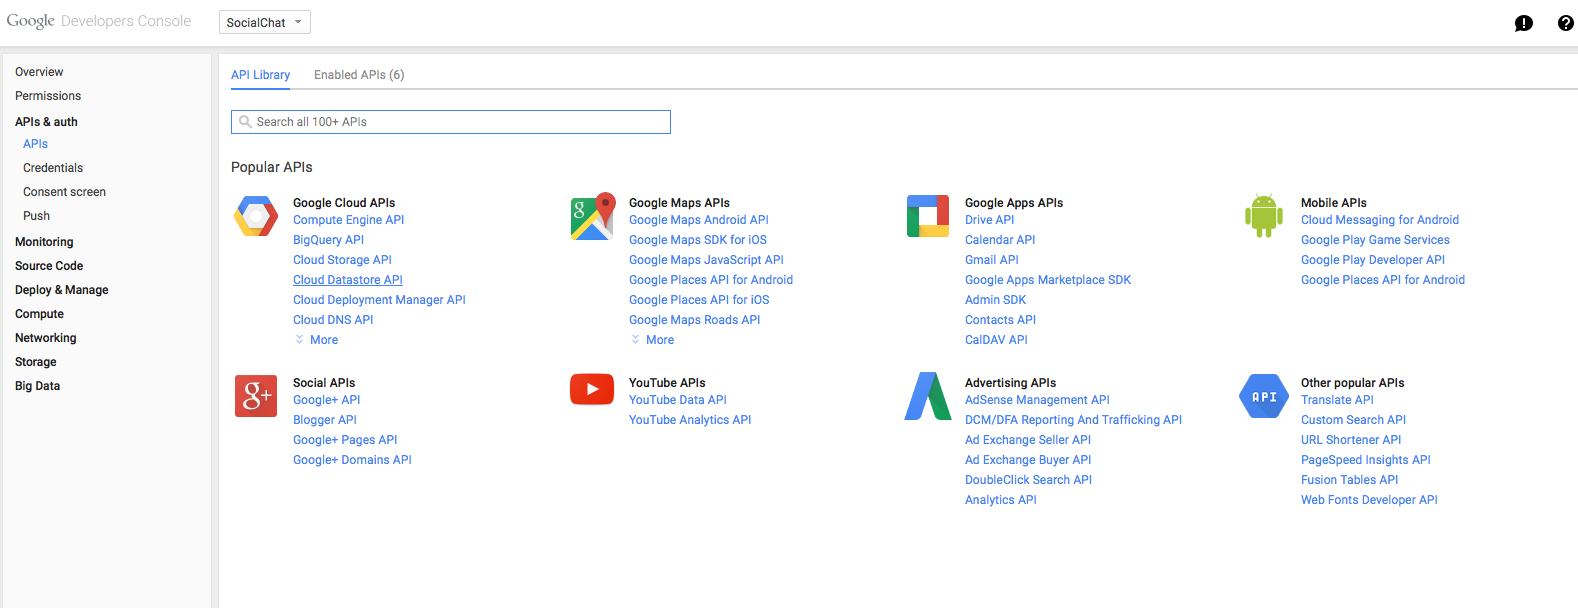
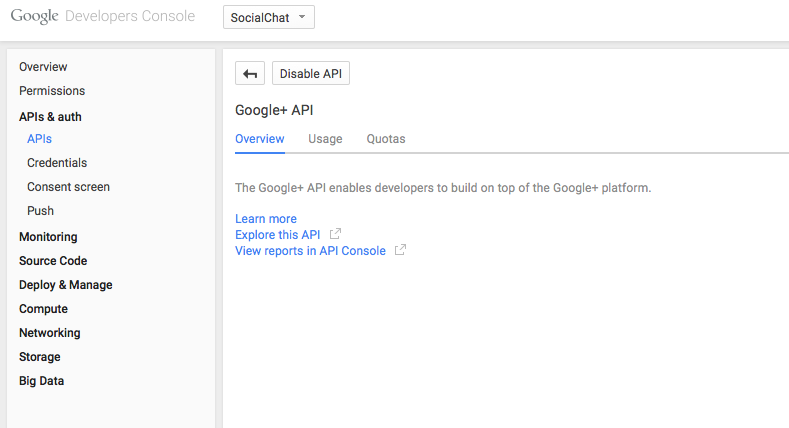
In that project you should click the Google+ API in the “Social” section:
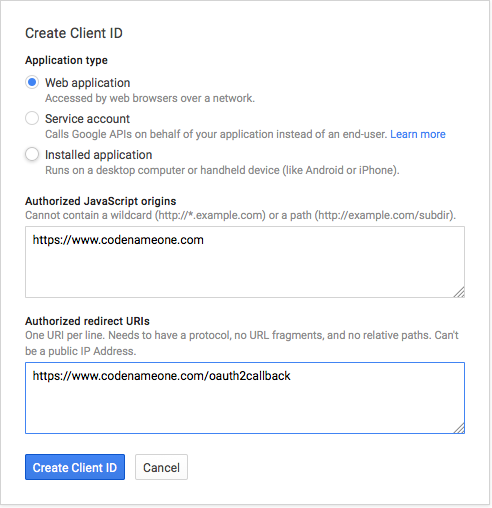
In the credentials section create a new client id, first we need to create one for a web application. This will be used by the simulator
so we can debug the application on the desktop. It will also be used by ports for JavaScript, Desktop and effectively
everything other than iOS & Android:
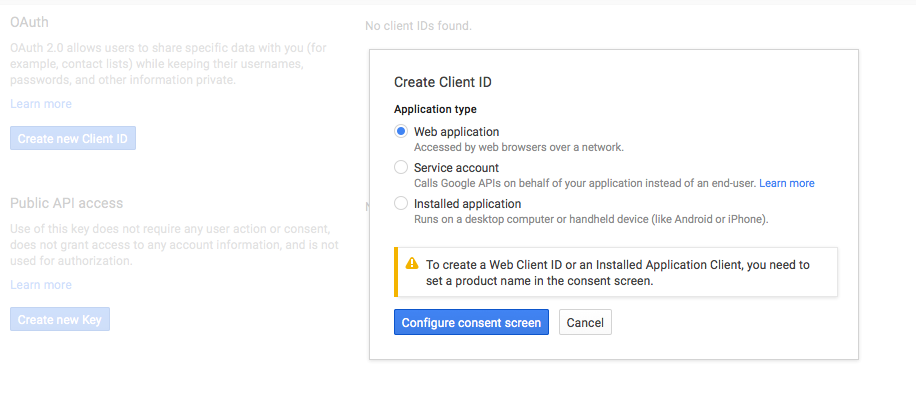
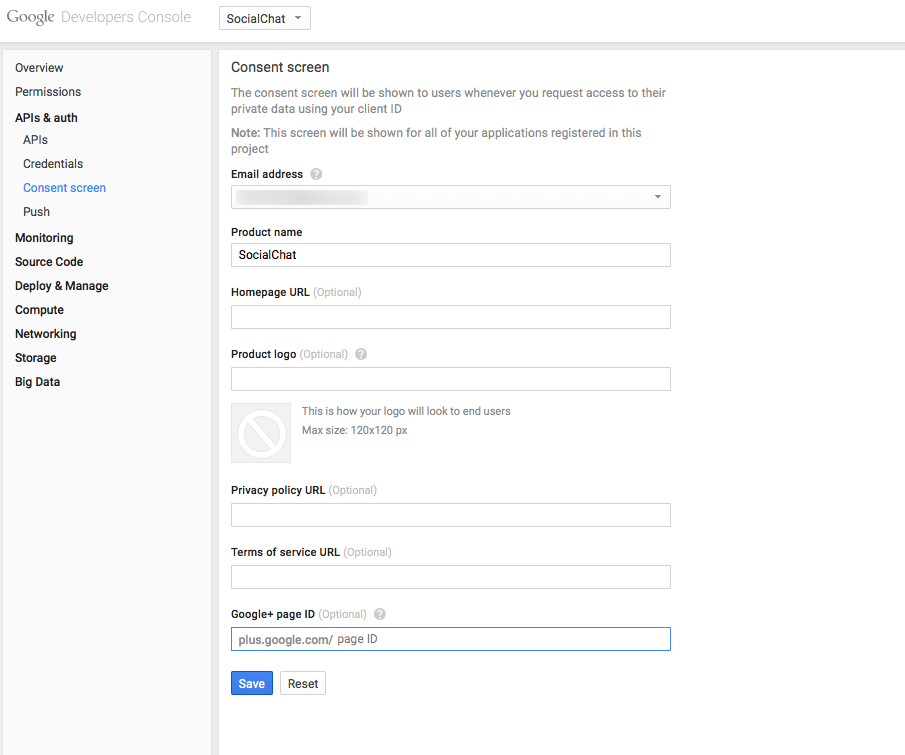
The consent screen is used to prompt users for permissions, you should normally fill it up properly for a “real world” application
but in this case we left it mostly empty for simplicities sake:
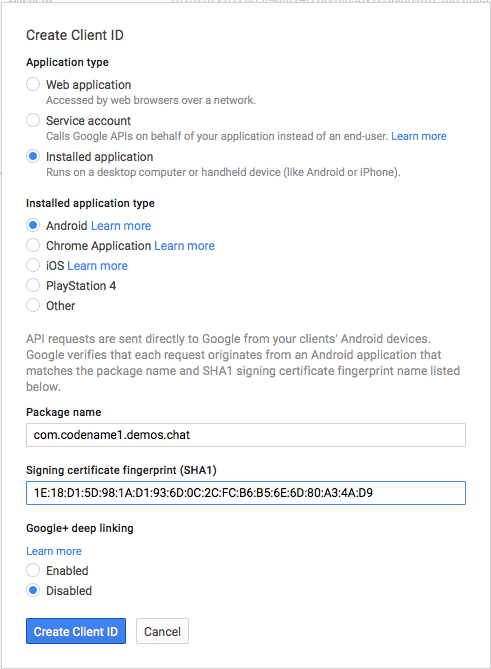
We now need to add Android/iOS native app bindings in much the same way as we did the web app
To build a native Android app make sure you setup the keystore correctly for your application. If you don’t have
an Android certificate you can use our visual wizard or use the command line mentioned in our signing tutorial.
Now that you have a certificate you need two values for your app, the first is the package name which must match
the package name of your main class (the one with the start, stop methods). It should be listed in the Codename One properties
section. Make sure to use a name that is 100% unique to you and using your own domain, don’t use the com.codename1 prefix or
anything such as that…
You also need the SHA1 value for your certificate, this is explained by Google here: https://developers.google.com/+/mobile/android/getting-started
Effectively you need to run this command line:
$ keytool -exportcert -alias androiddebugkey -keystore ~/.android/debug.keystore -list -vThis will prompt for a password then print several lines of data one of which should start with SHA1 that is the value
that you will need for the Android app.
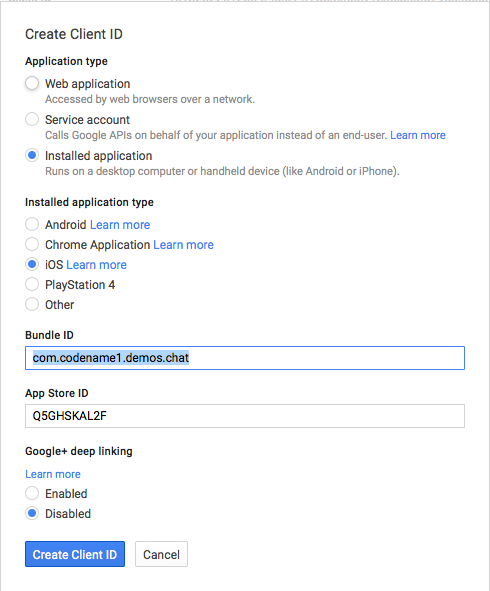
The iOS app needs the same package name as the bundle id. It also needs the appstore id which you can get from
itunes, it should appear as the prefix for your apps provisioning profile. If your app is correctly configured e.g.
by using the Codename One certificate wizard, then you should see it in the project properties under the Codename One→iOS section.
After everything is completed you should see something similar to this:
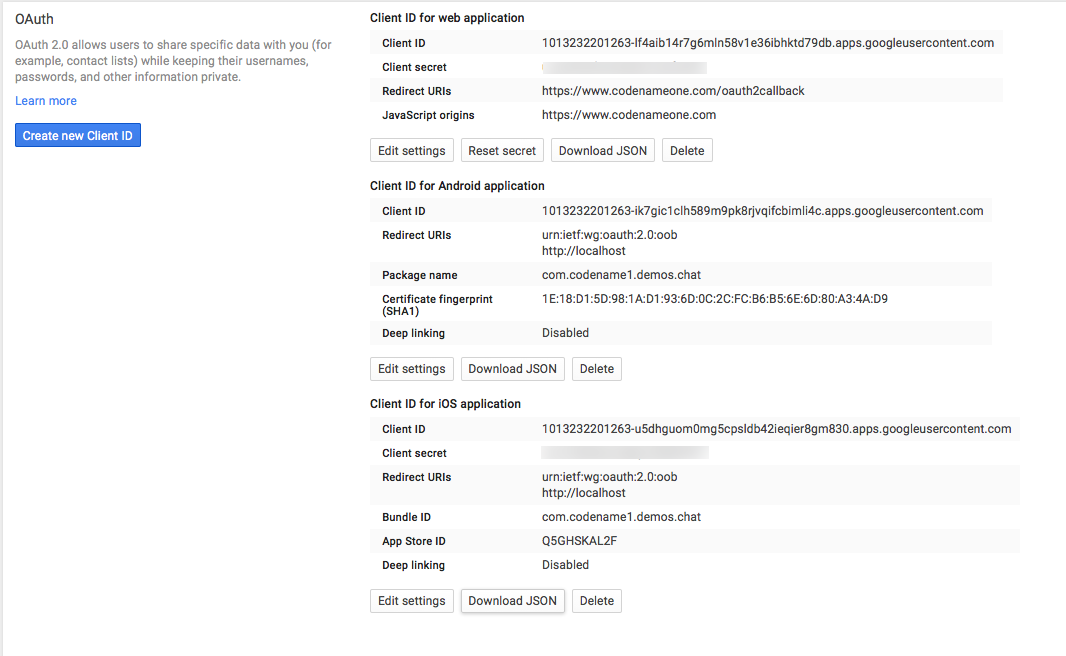
Project Configuration
We now need to set some important build hints in the project so it will work correctly. To set the build hints just right click the project
select project properties and in the Codename One section pick the second tab. Add these entries into the table:
ios.gplus.clientId=your ios client ID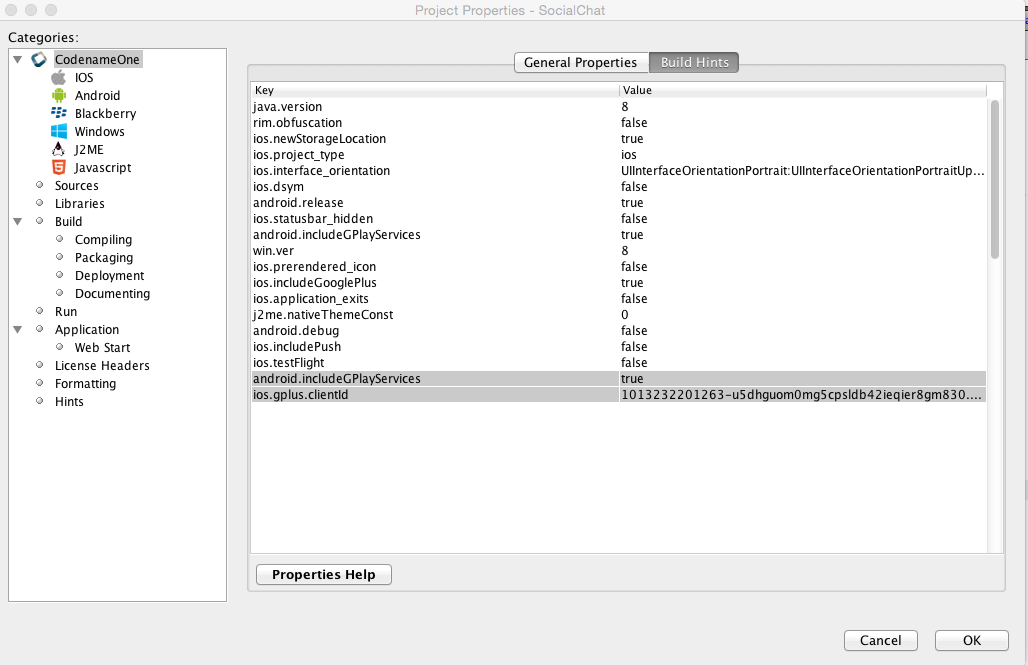
The Code
So now that all of that is in place we would want it to work with our app…
First to make the code more generic we’ll define this interface that we can implement both for Facebook & Google
thus generalizing the login code:
static interface UserData {
    public String getName();
    public String getId();
    public String getImage();
    public void fetchData(String token, Runnable callback);
}
The way this interface is meant to work, is that we would invoke fetchData after the login process completes to fetch
the data from Google/Facebook and then have name/id & image available to us.
Also notice that the fetchData is asynchronous and will invoke a callback when it completes. We could have made
it synchronous and used invokeAndBlock.
The code that binds this to the button looks like this:
loginWithGoogle.addActionListener((e) -> {
    tokenPrefix = "google";
    Login gc = GoogleConnect.getInstance();
    gc.setClientId("1013232201263-lf4aib14r7g6mln58v1e36ibhktd79db.apps.googleusercontent.com");
    gc.setRedirectURI("https://www.codenameone.com/oauth2callback");
    gc.setClientSecret("-------------------");
    doLogin(gc, new GoogleData(), false);
});
Notice that we hid the client secrete and used the GoogleData class which is effectively the implementation of the
UserData interface. The GoogleData class looks like this:
class GoogleData extends ConnectionRequest implements UserData {
    private Runnable callback;
    private Map<String, Object> parsedData;

    @Override
    public String getName() {
        return (String) parsedData.get("displayName");
    }

    @Override
    public String getId() {
            return parsedData.get("id").toString();
    }

    @Override
    public String getImage() {
        Map<String, Object> imageMeta = ((Map<String, Object>) parsedData.get("image"));
        return (String)imageMeta.get("url");
    }

    @Override
    public void fetchData(String token, Runnable callback) {
        this.callback = callback;
        addRequestHeader("Authorization", "Bearer " + token);
        setUrl("https://www.googleapis.com/plus/v1/people/me");
        setPost(false);
        NetworkManager.getInstance().addToQueue(this);
    }

    @Override
    protected void handleErrorResponseCode(int code, String message) {
        //access token not valid anymore
        if(code >= 400 && code <= 410){
            doLogin(GoogleConnect.getInstance(), this, true);
            return;
        }
        super.handleErrorResponseCode(code, message);
    }

    @Override
    protected void readResponse(InputStream input) throws IOException {
        JSONParser parser = new JSONParser();
        parsedData = parser.parseJSON(new InputStreamReader(input, "UTF-8"));
    }

    @Override
    protected void postResponse() {
        callback.run();
    }
}
Generally there isn’t all that much to the class. fetchData uses a connection request to connect to a URL in the
Google+ API that returns details about the user when the token is set. These details are returned as a JSON string
that we then parse and set to the right variables.
The JSONParser class returns the JSON data as a tree of lists & maps that we can traverse thru to extract the data we need.
One value that might not be clear to the casual observer is the token, this is a string that contains a “key” to the users
account. Facebook/Google etc. keep the passwords for their users hashed in their database (effectively meaning
even they don’t know the passwords), so to prove that we got permission from the user to access their data we
get a unique token that looks like a long string of gibberish and we can use that when accessing their respective API’s
thus validating ourselves. This is a very common practice… However, tokens expire occasionally and thus you might
need to “refresh” your token by logging in again as demonstrated in the next block of code.
Now we can go to the actual login process which is generic for both Google & Facebook login thanks to the class above
and the builtin abstractions in Codename One:
private String fullName;
private String uniqueId;
private String imageURL;
void doLogin(Login lg, UserData data, boolean forceLogin) {
    if(!forceLogin) {
        if(lg.isUserLoggedIn()) {
            showContactsForm(data);
            return;
        }

        // if the user already logged in previously and we have a token
        String t = Preferences.get(tokenPrefix + "token", (String)null);
        if(t != null) {
            // we check the expiration of the token which we previously stored as System time
            long tokenExpires = Preferences.get(tokenPrefix + "tokenExpires", (long)-1);
            if(tokenExpires < 0 || tokenExpires > System.currentTimeMillis()) {
                // we are still logged in
                showContactsForm(data);
                return;
            }
        }
    }

    lg.setCallback(new LoginCallback() {
        @Override
        public void loginFailed(String errorMessage) {
            Dialog.show("Error Logging In", "There was an error logging in: " + errorMessage, "OK", null);
        }

        @Override
        public void loginSuccessful() {
            // when login is successful we fetch the full data
            data.fetchData(lg.getAccessToken().getToken(), ()-> {
                // we store the values of result into local variables
                uniqueId = data.getId();
                fullName = data.getName();
                imageURL = data.getImage();

                // we then store the data into local cached storage so they will be around when we run the app next time
                Preferences.set("fullName", fullName);
                Preferences.set("uniqueId", uniqueId);
                Preferences.set("imageURL", imageURL);
                Preferences.set(tokenPrefix + "token", lg.getAccessToken().getToken());

                // token expiration is in seconds from the current time, we convert it to a System.currentTimeMillis value so we can
                // reference it in the future to check expiration
                Preferences.set(tokenPrefix + "tokenExpires", tokenExpirationInMillis(lg.getAccessToken()));
                showContactsForm(data);
            });
        }
    });
    lg.doLogin();
}
Now that’s a big block of code but it doesn’t really do that much. All it does is delegate to the UserData interface
and validates the token. It also stores returned data and shows the next form (which we won’t cover right now).
The last piece of code for this section is a small utility method that we used for token expiration detection:
/**
 * token expiration is in seconds from the current time, we convert it to a System.currentTimeMillis value so we can
 * reference it in the future to check expiration
 */
long tokenExpirationInMillis(AccessToken token) {
    String expires = token.getExpires();
    if(expires != null && expires.length() > 0) {
        try {
            // when it will expire in seconds
            long l = (long)(Float.parseFloat(expires) * 1000);
            return System.currentTimeMillis() + l;
        } catch(NumberFormatException err) {
            // ignore invalid input
        }
    }
    return -1;
}
This effectively allows us to detect if the token expired or not in a future execution of the app.
Note: I’ve added the tokenPrefix variable which was missing in the original post, it allows differentiating between
a Google and Facebook login and the fact that it was missing caused some amusing bugs.
|
The original post discussed using the email address as the unique user ID which was the initial direction we were going for. But we since decided to go in a different route with user ID’s (similar to the Facebook experience). We also made some minor changes to error handling logic making the code more robust. We also changed the token expiration parsing logic to use a float value. |
| Updated again to remove the gplay-service build hint which is no longer needed |
Other Posts In This Series
This is a multi-part series of posts including the following parts:
You can check out the final source code of this tutorial here.


3 Comments
i am following…..Great stuff co-founder
Are the information and code of this tutorial about Facebook login and Google login still valid?
Should be. It’s a bit old so I’d like to refresh it eventually.