This post was written by
Steve Hannah
, one of the newest additions to the Codename One team and a long time community contributor.
The new Codename One graphics pipeline includes support for advanced 2D and 3D transformations.
Last time
I talked about some of the new features in Codename One’s graphics. Then I presented an example app to demonstrate the use of the new shapes API. In this instalment, I will focus on some of the new graphics transformation features.
Background
The Graphics class has included limited support for 2D transformations for some time now including scaling, rotation, and translation:
-
scale(x,y) : Scales drawing operations by a factor in each direction. -
-
translate(x,y) : Translates drawing operations by an offset in each direction. -
-
rotate(angle) : Rotates about the origin. -
-
rotate(angle, px, py) : Rotates about a pivot point. -
Note: scale() and rotate() methods are only available on platforms that support Affine transforms. Currently only Android, iOS and the simulator (JavaSE) support these methods.
Device Support
You can check if a particular Graphics context supports rotation and scaling using the isAffineSupported() method.
e.g.
public void paint(Graphics g) {
if ( g.isAffineSupported() ){
// Do something that requires rotation and scaling
} else {
// Fallback behaviour here
}
}
Example:
Drawing an Analog Clock
In the following sections, I will implement an analog clock component. This will demonstrate three key concepts in Codename One’s graphics:
-
Using the GeneralPath class for drawing arbitrary shapes.
-
Using Graphics.translate() to translate our drawing position by an offset.
-
Using Graphics.rotate() to rotate our drawing position.
There are three separate things that need to be drawn in a clock:
-
The tick marks
. E.g. most clocks will have a tick mark for each second, larger tick marks for each hour, and sometimes even larger tick marks for each quarter hour.
-
The numbers
. We will draw the clock numbers (1 through 12) in the appropriate positions.
-
The hands
. We will draw the clock hands to point at the appropriate points to display the current time.
The AnalogClock Component
Our clock will extend the Component class, and override the paintBackground() method to draw the clock as follows:
Setting up the Parameters
Before we actually draw anything, let’s take a moment to figure out what values we need to know in order to draw an effective clock. Minimally, we need two values:
-
The center point of the clock.
-
The radius of the clock.
In addition, I am adding the following parameters to to help customize how the clock is rendered:
-
The padding
(i.e. the space between the edge of the component and the edge of the clock circle.
-
The tick lengths
. I will be using 3 different lengths of tick marks on this clock. The longest ticks will be displayed at quarter points (i.e. 12, 3, 6, and 9). Slightly shorter ticks will be displayed at the five-minute marks (i.e. where the numbers appear), and the remaining marks (corresponding with seconds) will be quite short.
Drawing the Tick Marks
For the tick marks, we will use a single GeneralPath object, making use of the moveTo() and lineTo() methods to draw each individual tick.
Tip:
This example uses a little bit of trigonometry to calculate the (x,y) coordinates of the tick marks based on the angle and the radius. If math isn’t your thing, don’t worry. This example just makes use of the identities: x=r*cosθ and y=r*sinθ.
For more information about drawing shapes using GeneralPath, I recommend you check out my
previous post on Codename One Graphics
.
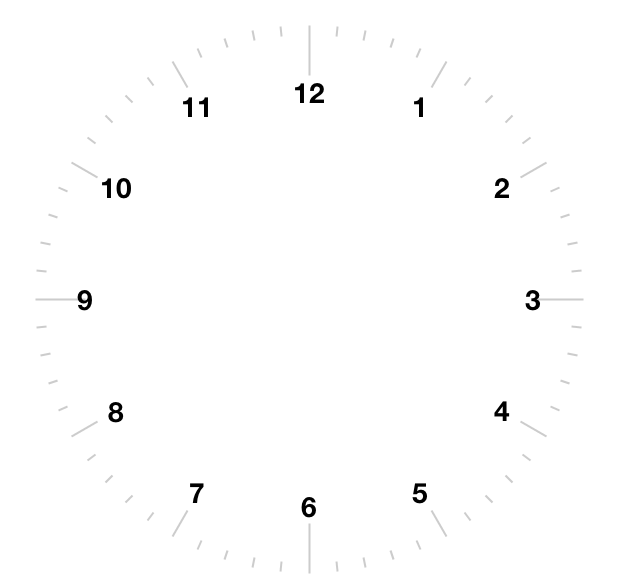
At this point our clock should include a series of tick marks orbiting a blank center as shown below:

Drawing the Numbers
I have seen clocks before that don’t include any actual numbers, but these are far too advanced for my rudimentary clock-reading skills. I want my clock to have numbers on it. Nothing fancy. Just “1” through “12” labelling the appropriate tick marks.
The Graphics.drawString(str, x, y) method allows you to draw text at any point of a component. The tricky part here is calculating the correct x and y values for each string so that the number appears in the correct location.
For the purposes of this tutorial, I’m going to use the following strategy. For each number (1 through 12):
-
Use the Graphics.translate(x,y) method to apply a translation from the clock’s center point to the point where the number should appear.
-
Draw number (using drawString()) at the clock’s center. It should be rendered at the correct point due to our translation.
-
Invert the translation performed in step 1.
Note:
This example is, admittedly, a little contrived to allow for a demonstration of the Graphics.translate() method. We could have just as easily passed the exact location of the number to drawString() rather than draw at the clock center and translate to the correct location.
Now, we should have a clock with tick marks and numbers as shown below:
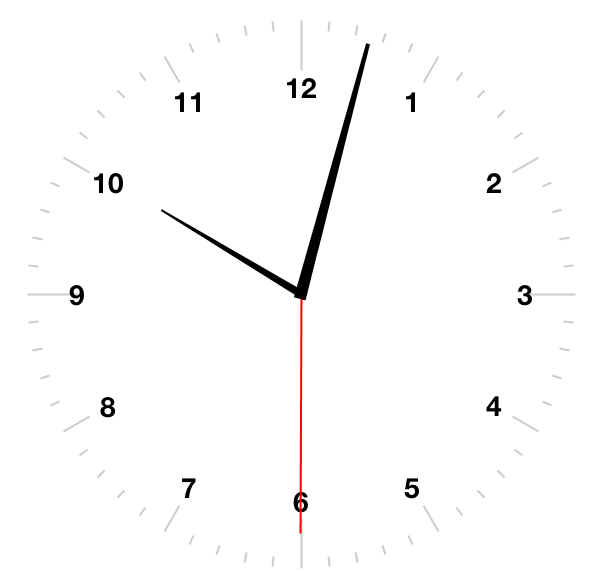
Drawing the Hands
Our clock will include three hands: Hour, Minute, and Second. I will use a separate GeneralPath object for each hand. For the positioning/angle of each, I will employ the following strategy:
-
Draw the hand at the clock center pointing toward 12 (straight up).
-
Translate the hand slightly down so that it overlaps the center.
-
Rotate the hand at the appropriate angle for the current time, using the clock center as a pivot point.
Drawing the Second Hand
For the “second” hand, I will just use a simple line from the clock center to the inside edge of the medium tick mark at the 12 o’clock position.
GeneralPath secondHand = new GeneralPath();
secondHand.moveTo((float)cX, (float)cY);
secondHand.lineTo((float)cX, (float)(cY-(r-medTickLen)));
And I will translate it down slightly so that it overlaps the center. This translation will be performed on the GeneralPath object directly rather than through the Graphics context:
Shape translatedSecondHand = secondHand.createTransformedShape( Transform.makeTranslation(0f, 5) );
Rotating the Second Hand
The rotation of the second hand will be performed in the Graphics context via the rotate(angle, px, py) method. This requires us to calculate the angle. The px and py arguments constitute the pivot point of the rotation, which, in our case will be the clock center.
Warning:
The rotation pivot point is expected to be in absolute screen coordinates rather than relative coordinates of the component. Therefore we need to get the absolute clock center position in order to perform the rotation.
Note:
Remember to call resetAffine() after you’re done with the rotation, or you will see some unexpected results on your form.
Drawing the Minute And Hour Hands
The mechanism for drawing the hour and minute hands is largely the same as for the minute hand. There are a couple of added complexities though:
-
We’ll make these hands trapezoidal, and almost triangular rather than just using a simple line. Therefore the GeneralPath construction will be slightly more complex.
-
Calculation of the angles will be slightly more complex because they need to take into account multiple parameters. E.g. The hour hand angle is informed by both the hour of the day and the minute of the hour.
The remaining drawing code is as follows:
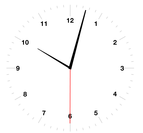
The Final Result
At this point, we have a complete clock as shown below:
You can view the full source to this component
here
.
Animating the Clock
The current clock component is cool, but it is static. It just displays the time at the point the clock was created. Next time we’ll improve on this by adding animation support so that the clock will “tick” and keep the correct time – just like a real clock.
Notice: This post was automatically converted using a script from an older blogging system. Some elements might not have come out as intended…. If that is the case please let us know via the comments section below.

13 Comments
That’s very cool Steve. Semi off-topic, but you might be interested in this JavaFX clock: [http://blog.crisp.se/2012/0…](http://blog.crisp.se/2012/09/24/oscarlantz/analog-clock-revisited) – it uses JavaFX bound properties in a very elegant fashion.
As an FYI I created the original properties project that inspired JavaFX properties: [https://java.net/projects/b…](https://java.net/projects/bean-properties/)
This predated my LWUIT work but we didn’t take it into LWUIT due to size concerns… Adding “proper” properties to Codename One is something that has been on my wishlist for quite some time, but to do this properly I would want the VM to support this internally so properties would have zero overhead compared to fields. That would take some effort…
I can blame you ! LOL. I have to admit having used Swing, LWUIT etc for a very long time, then coming to FX with it’s extensive use of binding was quite a shock and hard on my tired old brain – but then when see code like the clock I mentioned, where the binding makes it “just work” with almost no code, you can really see the power of the concept.
Great stuff!! Thanks for this. We need more examples that push CN1 to its limits!
In case some one struggles with showing the clock.. just set the form layout to GridLayout like this:
Form f = new Form(“”);
f.setLayout(new GridLayout(1, 1));
AnalogClock analogClock = new AnalogClock();
f.addComponent(analogClock);
f.repaint();
[f.show](http://f.show)();
how do I get the clock to have the time automatically
You can use the java.util.Calendar class to get the current time and set it to the hands.
See the last section of this tutorial with animating the clock.
Thanks for this example.
But do you know why It doesn’t work If I add AnalogClock in Container sets with BoxLayout ?
Did you override calcPreferredSize() to give the clock a size?
No, juste:
tb.addCommandToSideMenu(new Command(“Clock2”, theme.getImage(“teams_icn_badgeage_48x48.png”)) {
@Override
public void actionPerformed(ActionEvent evt) {
Form fm = new Form(new BoxLayout(BoxLayout.Y_AXIS));
TmAnalogClock clock = new TmAnalogClock();
fm.addComponent(clock);
[fm.show](http://fm.show)();
}
});
You need to override the calcPreferredSize() to give the clock a size or invoke setPreferredSize() to hardcode a minimum size.
Thanks, it works.
imports ,please
import com.codename1.ui.*;