Adding Text Messages from Other Users
Our current example only includes messages that the current user posted themself. I.e. We only have chat bubbles on the right-hand side of the view. Let’s add some more sample data to our view model to give us a feel for how a real chat will look. In the ChatFormController class, we’ll change the createViewModel() method as follows:
Creating more interesting sample data for the ChatRoom’s view model. We add messages from both the current user and other users.
// Create a view model for the chat room
private Entity createViewModel() {
    ChatRoomView.ViewModel room = new ChatRoomView.ViewModel();

    // Make up some dummy times for the chat messages.
    long SECOND = 1000l;
    long MINUTE = SECOND * 60;
    long HOUR = MINUTE * 60;
    long DAY = HOUR * 24;

    // Make first message 2 days ago.
    long t = System.currentTimeMillis() - 2 * DAY;

    // Some thumbnails for the avatars of the participants
    String georgeThumb = "https://weblite.ca/cn1tests/radchat/george.jpg";
    String kramerThumb = "https://weblite.ca/cn1tests/radchat/kramer.jpg";

    room.addMessages(createDemoMessage("Why couldn't you have made me an architect? You know I always wanted to pretend that I was an architect. "
            + "Well I'm supposed to see her tomorrow, I'm gonna tell her what's goin on. Maybe she likes me for me.",
            new Date(t), "George", georgeThumb));
    t += HOUR;
    room.addMessages(createDemoMessage("Hey", new Date(t), "Kramer", kramerThumb));
    t += MINUTE;
    room.addMessages(createDemoMessage("Hey", new Date(t), null,  null));

    return room;
}

// Create a single demo message
private Entity createDemoMessage(String text,
        Date datePosted,
        String participant,
        String iconUrl) {
    ChatBubbleView.ViewModel msg = new ChatBubbleView.ViewModel();
    msg.messageText(text)
            .date(datePosted)
            .iconUrl(iconUrl)
            .isOwn(participant == null);
    if (participant != null) {
        msg.postedBy(participant);
    }
    return msg;
}
To make things easier to read, I’ve broken out the code for creating a message into a separate method so we can call create new messages more easily. I’ve created a couple of pretend users, “George” and “Kramer”, and I’ve provided some thumbnail URLs for them, which can be used as avatars in the chat room.
And the result:
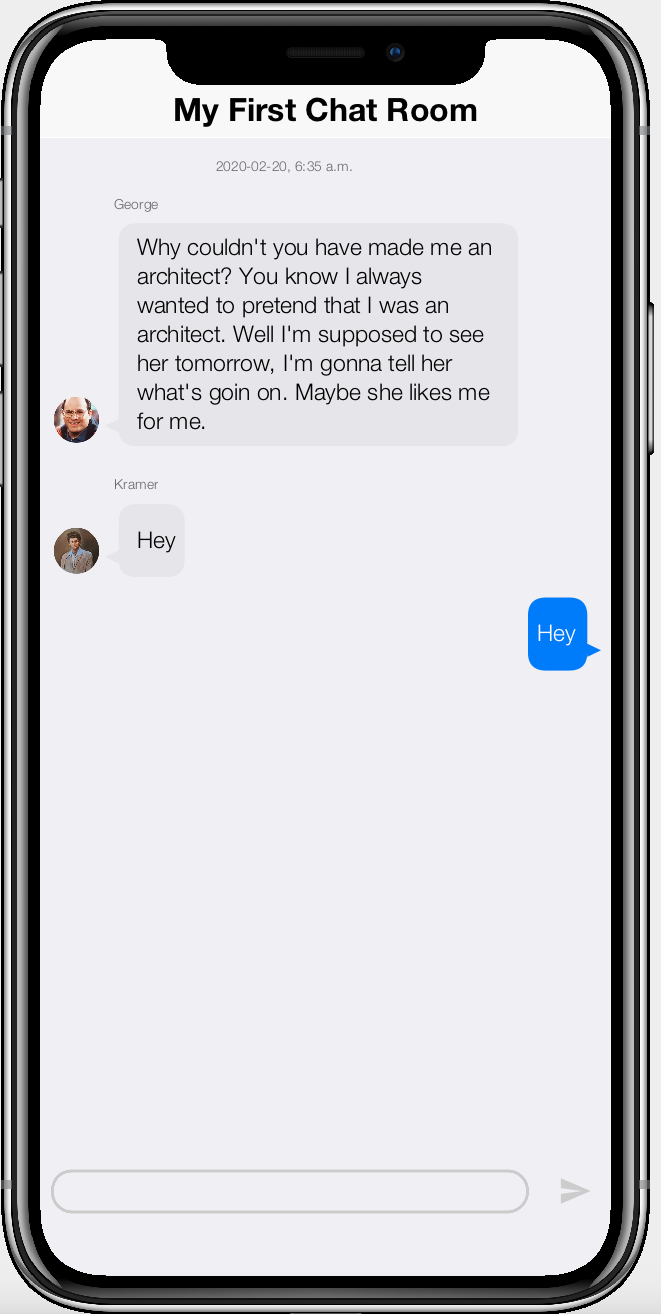
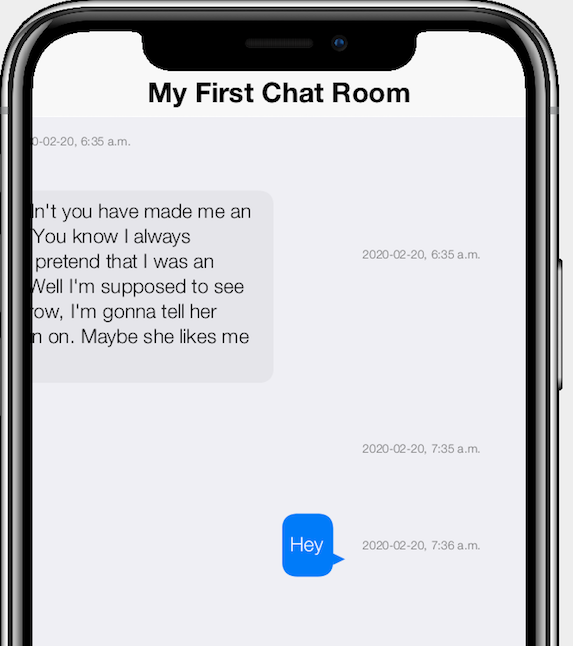
Notice that it shows the time of the first chat message, but not the others. This is intentional. The chat room will only show the time of messages if there is a long delay between it and the previous message. You can see the time of each message by swiping to the left:
Recall the screenshot of the finished app, in which the form title included a list of participants in the chat room with their avatars.
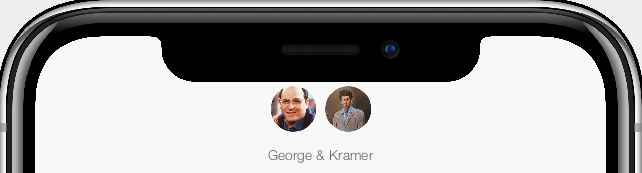
Let’s add this now by adding some participants to the view model. The ChatRoomView.ViewModel includes methods to directly add participants to the model via addParticpant(Entity… participants). Each participant entity should implement the Thing.name or Thing.thumbnailUrl tags, or both. If Only Thing.name is provided, then it will generate an avatar with the first letter of their name. If Thing.thumbnailUrl is provided, then it will use the image at this url as the avatar.
Let’s begin by creating a custom entity/view model named “ChatAccount” which will be used as participants in the chat. Create a new Java class named “ChatAccount” with the following contents:
The ChatAccount entity will be used to encapsulate profiles for participants in the chat room.
package com.codename1.cn1chat;
import com.codename1.rad.models.Entity;
import com.codename1.rad.models.EntityType;
import static com.codename1.rad.models.EntityType.tags;
import com.codename1.rad.models.StringProperty;
import com.codename1.rad.schemas.Thing;

/**
 * View model for an account profile.
 * @author shannah
 */
public class ChatAccount extends Entity {

    // The name property
    public static StringProperty name; (1)

    private static final EntityType TYPE = new EntityType() {{ (2)
        name = string(tags(Thing.name)); (3)
    }};
    {
        setEntityType(TYPE); (4)
    }

    public ChatAccount(String nm) {
        set(name, nm);
    }

}| 1 | The “name” property of our entity. |
| 2 | Define an entity type for the ChatAccount entity. The entity type defines which properties are supported by the ChatAccount entity. |
| 3 | Generating the “name” property as a string property. Notice that we assign the Thing.name tag to this property, which will allow views to bind to it. |
| 4 | Set the entity type inside the “instance” initializer so that all ChatAccount objects have the same entity type. This could have been placed inside the constructor, but placing it simply inside the initializer (i.e. inside {..}) makes for a little less typing, and also helps to signify the declarative nature of this call. |
I’ve added some notes about the key lines of the code listing above which should help to get you up to speed if this is your first custom entity. This entity defines a single property, “name”. If we were to define this entity as a POJO (Plain-Old Java object), the class might look something like:
What the ChatAccount entity would look like if implemented as a POJO (Plain old java object).
public class ChatAccount {
    private String name;
    public ChatAccount(String name) {
        this.name = name;
    }
}The Entity class, together with EntityType provide lots of useful features such as bindable properties, property change events, data conversion, observability, and reflection. All of these features are necessary to enable the creation of loosely coupled components with clean separation between models, views, and controllers. As you’ll see, this loose coupling greatly enhances our ability to produce complex, reusable components, which results in better apps with less code.
Finally… Adding the Participants
After a lengthy discussion of Entities, Entity types, Tags, and Properties, we can now go ahead and add some participants to the chat room. Add the following inside our createViewModel() method of the ChatFormController class:
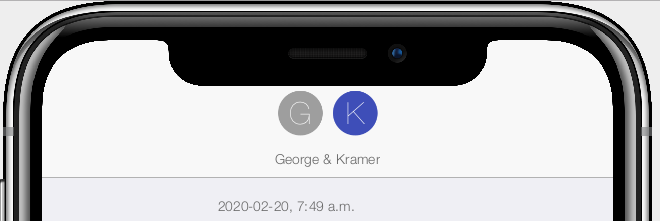
room.addParticipants(new ChatAccount("George"), new ChatAccount("Kramer"));This adds two profiles to the chat room as participants. Now, if we launch the app we’ll see the form title replaced with the following avatars.
Now, let’s go a step further and add a “thumbnail url” property to our ChatAccount entity.
Adding a thumbnailUrl property to the ChatAccount entity:
package com.codename1.cn1chat;
import com.codename1.rad.models.Entity;
import com.codename1.rad.models.EntityType;
import static com.codename1.rad.models.EntityType.tags;
import com.codename1.rad.models.StringProperty;
import com.codename1.rad.schemas.Thing;

/**
 * View model for an account profile.
 * @author shannah
 */
public class ChatAccount extends Entity {

    // The name property
    public static StringProperty name, thumbnailUrl;

    private static final EntityType TYPE = new EntityType() {{
        name = string(tags(Thing.name));
        thumbnailUrl = string(tags(Thing.thumbnailUrl));
    }};
    {
        setEntityType(TYPE);
    }

    public ChatAccount(String nm, String thumb) {
        set(name, nm);
        set(thumbnailUrl, thumb);
    }

}
And modify our ChatFormController to set the thumbnail URL on our entity.
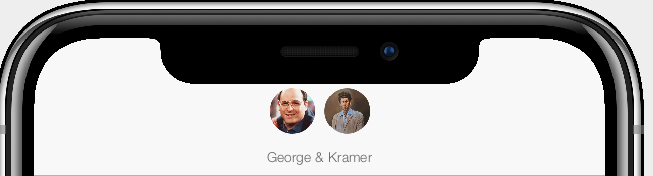
room.addParticipants(
    new ChatAccount("George", georgeThumb),
    new ChatAccount("Kramer", kramerThumb)
);
And reload…
Next Week
In part four we’ll discuss adding more actions.